Novamente falando sobre armazenamento no cloud depois do fim do UbuntuOne e Condoleezza Rice se juntar ao board do Dropbox.
Antes eu tinha descrito uma mudança experimental pro Box.com. Foi bem experimental mesmo. Totalmente. Depois de usar um pouco, simplesmente desisti. Quando alguém não suporta bem Linux, é um trabalho ingrato pra ter as coisas funcionando corretamente. O Box.com não sincronizava bem via webdavs. Às vezes só corrompia o arquivo, às vezes não copiava nada e ficava travado.
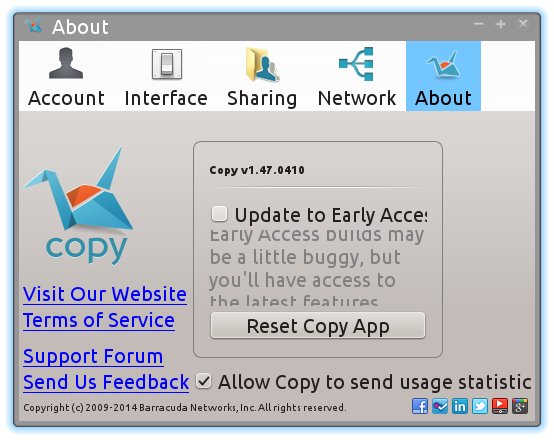
Entre post daqui e dali desse assunto, sobre abandonar o dropbox em favor do box.com, o amigo Kemel Zaidan me falou do Copy. Um serviço de storage com mais espaço disponível, 15 GB, e que tinha aplicativo pra Linux. Ao tentar acessar, descobri que até já tinha me registrado, mas nunca usado efetivamente. Bastou pedir pra re-enviar a senha pra ter tudo no lugar.
Uma das coisas boas do Copy era a possibilidade de copiar os dados do Dropbox pra ele, diretamente, o que fiz. Fiz o sincronismo no disco e juntei os dados do UbuntuOne. E pronto! Todos os meus storages de cloud num só lugar. E que funciona tanto no Linux quanto nos meus dispositivos móveis, celular e tablet.
O Copy é mantido pela empresa Barracuda Networks. A primeira vista eu achei que era uma empresa ligada aos HDs Barracuda, mas esses eram uma linha de HDs da Seagate. E só. Barracuda Networks é uma outra empresa, localizada no vale do silício, que tem soluções para redes. Entre essas, tem o storage.
Vale do silício? Sim. Então significa que não deve estar muito longe da xeretagem da NSA. Continua não sendo um meio confiável pra informações confidenciais, o que continua não sendo meu caso. Em geral armazeno scripts pra evitar fazer rsync pra todo lado, e documentos em pdf.
Outro ponto negativo é que tem aplicativo pra Linux, mas não necessariamente com código aberto. É possível baixar e instalar, mas não verificar o que está fazendo exatamente. É instalar um binário e rezar pra não ter código malicioso ali. Eu não rodo como root, mas não significa que não tenha acesso aos meus dados importantes de usuário.
Sim Com certeza. Mas eles só fornecem 2 GB gratuitos.
Como meus dados não são lá muito secretos, eu prefiro no momento um sistema que é suscetível à NSA, mas se eu fosse armazenar dados confidenciais, com certeza escolheria outra opção.
Entenda que "sigilo" não é "confidencialidade". É como seus dados bancários: a informação é sigilosa, que só você e o banco podem ver. Mas não é criptografada. Quem tiver permissão de acesso às contas, pode ver seu saldo, seus gastos, histórico de gastos, etc. É mais ou menos o que acontece com seus dados em empresas como a Copy: meus dados estão lá e são sigilosos, mas não estão criptografados pros sistemas da empresa. Então eventualmente podem ser buscados com um "grep" pra achar informações.
Não gosta que ninguém olhe seus arquivos? É um ponto justo. E nesse caso o melhor é usar os serviços do SpideOak ou mesmo instalar seu próprio cloud com owncloud.
Mega tem a vantagem de oferecer 50 GB de espaço. É de longe o maior espaço disponível. E diz manter a confidencialidade e o sigilo dos dados armazenados. Parece legal, mas até agora não tem aplicativo cliente pra Linux, e eu não quero um storage em cloud onde meus dados fiquem somente lá. Quero um replicação de dados. Ainda mais que Kim Dotcom, o dono do Mega, está no foco do FBI. A qualquer momento pode ter seu site fechado novamente.
Com isso, nesse momento, eu estou preferindo o Copy. Mas é um mundo de Internet. Amanhã posso usar outra coisa.
 Finalmente criei vergonha na cara e criei um certificado pra usar https no site. Não que eu não usasse criptografia antes, mas era um certificado auto-assinado com aquele "SnakeOil". Motivo? Simplesmente uso conexão segura pra postar no site, e mais nada.
E os usuários? Bom... eu não tenho um "grande" site com muito tráfego. Acho que ninguém vai se sentir ofendido pelo fato de não ser possível acessar o conteúdo via https. Aliás, até é mas vi que várias coisas no Joomla estão apontando pra http ao usar https. Um dia eu devo arrumar isso. Ou mudar o tema pra algum que tenha isso corrigido.
Mas o importante de ter um certificado ssl pro meu https é que consegui um assinado. E gratuitamente. A autoridade certificadora startssl fornece gratuitamente certificados de nível 1. São os mais simples, mas pra quem quer algo gratuito, vale a pena.
O melhor é que bastou seguir uma receita de bolo que o pessoal da DigitalOcean fez:
Rápido, fácil e funcional. Quem ainda não tiver um certificado assinado, vale a pena tanto por ser gratuito quanto pelo aprendizado.
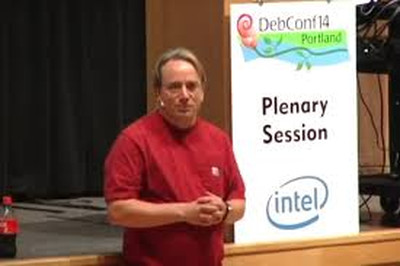
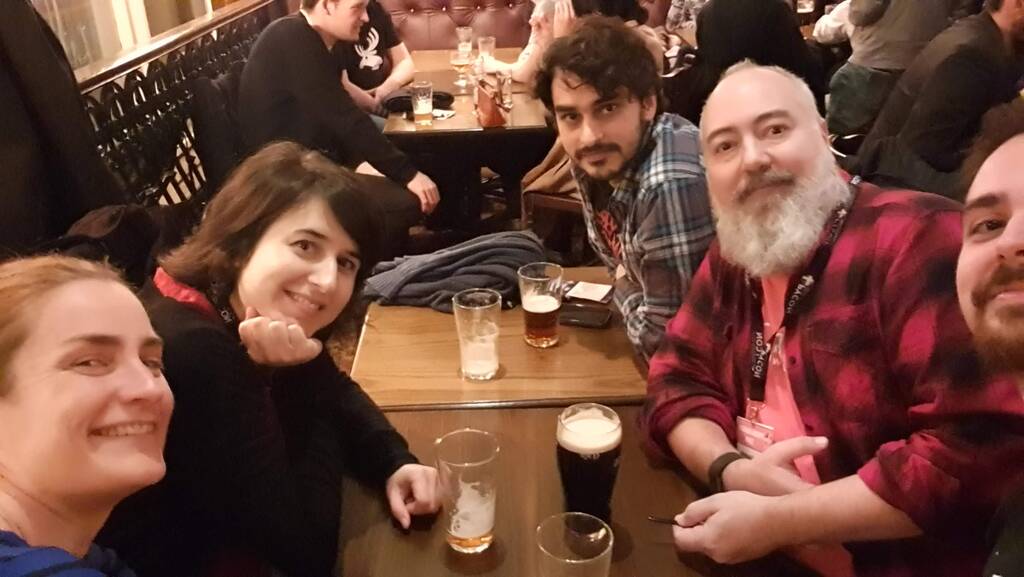
Acho o Linus Torvalds genial. Não que seja um cara que criou um kernel, mas é um cara que criou um sistema de crontrole de versão de software, o GIT, em 2 semanas. Ou seja, ele é genial.
E ele apareceu na DebConf 14, que ocorreu faz poucas semanas, em Portland, EUA, pra falar um pouco. Foi uma sessão de perguntas e respostas.
O que esperar de alguém que criou o kernel de um sistema operacional? Perguntas técnicas de altíssimo nível? Um semi-deus falando? Escovação de bits?
Pois o grupo de desenvolvedores de Debian (ou seria "empacotadores") mostrou que não. De perguntas técnicas a perguntas idiotas. Sim, idiotas. Debian é um projeto de distro aberta. Isso não significa uma supremacia em inteligência. Tem muita gente que se preocupa com "comunidade", com o Linus chamando de idiota alguém que mereça.
Mas vamos falar um pouco sobre tudo que foi dito durante a DebConf 14. Claro que não na ordem em que foi apresentado, mas na que me lembro (não, não vou ficar vendo o vídeo novamente e escrevendo notas sobre o mesmo pra descrever aqui. Deal with it).
Linus foi perguntado e responde sobre o famigerado "systemd". É bom? É ruim? Eu concordo muito com ele, que é uma grande inovação. Endereçou vários aspectos que eram deficitários no Unix por mostivos históricos de design. É melhor? Essa é a grande pergunta. Essa inovação trouxe junto uma complexadade que quebrou com o velho e bom KISS (Keep It Simple Stupid). Mas sempre existe o dilema do "manter o velho" ou "quebrar tudo e ir pro novo". No momento, é algo interessante, que parece promissor, mas ainda falta muita coisa pra melhorar, como um tempo de resposta menor na lista de bugtrack.
Eu pessoalmente não estou convencido da melhoria do systemd. Boot mais rápido? Meu laptop reboota com um kernel novo, sincronizado via git, a cada 30-45 dias. Boot rápido realmente não importa pra mim nesse caso.
Esse foi um ponto interessante, pois ele deixou claro que não usa, nem pretende usar. Não que Debian seja bom ou ruim pra ele, mas ele basicamente usa um sistema de desenvolvimento de kernel. Isso significa um sistema que depois da instalação esteja pronto pra seu uso, sem muita firula, nem ambientes gráficos dos melhores. Apenas gcc e kernel. Uma coisa que o incomoda é o fato de precisar gerar um pacote DEB pra ter o kernel em seu lugra pra testar (provavelmente se referindo ao kernel-package). Para ele, uma distro tem de prover um sistema rápido para usar "make; make install" e poder testar.
Faz anos que não uso "make; make install" pra instalar o kernel. Sempre uso o kernel-package pela facilidade de ter um pacote pronto e gerenciável. Então não sei nem o que dizer sobre essa reclamação do Linus. Claro que o uso dele é bem específico.
Linus disse que ainda sonha com a dominação do Linux no Desktop, assim como já domina os ambientes de servidor e de mobile. Mas que nesse ponto não depende do kernel, mas das distros. Elas que preparam o sistema pros usuários. E disse que os exemplos que ele enxerga com futuro nessa linha são os chrome books (chrome OS) e... Ubuntu. Qual usuários ele se refere? Ele deixa claro que não os usuários como nós, que já usam Linux, mas os iniciantes como crianças, idosos, etc, ou seja, pessoas que não são da área de TI. Esse são o foco que as distros têm de ter pra conseguir dominar o Linux no desktop.
Outro ponto que comentou foi em relação à steam, que a mesma está trazendo um visão de Linux desktop para os usuários. Infelizmente isso exige que ela distribua grandes pedaços de binários (linkados estaticamente) por conta da grande variedade de distros, cada uma com sua visão de sistema. Essa diversidade, por ser um ponto forte por um lado, é um ponto fraco no ponto de distribuição de binários diretamente pros usuários.
Nesse ponto ele comenta que decidiu não ir pelo caminho da GPLv3 pelo fato dela "exigir" a liberdade de quem usa o código. A GPLv2 permite uma troca de liberdades: eu permite que use meu código, se o melhorar, peço que devolva essa melhoria. Então a GPLv2, ao seu ver, é muito mais flexível e perto de uma licença BSD de uso. Já a GPLv3 exige que ao usar um código livre, o mesmo seja disponibilizado. Esse pequeno argumento muda o conceito de trocas, que tanto Linus preza. Então preferiu manter com a GPLv2 mas foi enfático em dizer que a GPLv3 não é ruim, mas não se adequa ao que ele quer pro kernel Linux como modelo de desenvolvimento.
Houve uma certa reclamação quanto a FSF e a forma que mudou a GPLv2 pra GPLv3, mas eu acho melhor deixar essa parte da discussão as puritas dos assuntos de liberdade. Por enquanto sigo a recomendação do Linus que disse que se quer falar de liberdade, melhor a EFF que a FSF.
É conhecido o fato do Linus Torvalds ter uma certa aversão a aparecer em público. O motivo? Ele não é uma das melhores pessoas do mundo. Não luta contra fome ou coisas do tipo. É um geek, um nerd, e como tal, tem seus momentos de explosão temperamental. Infelizmente esses momentos ficam gravados em listas e mails. Quando estão pessoalmente com ele, muitas das pessoas da audiência o julgam por seu comportamento, esperando dele algum tipo de de atitude mais "magnânima", mais em "pról da comunidade". Mas somos todos humanos, demasiados humanos, já dizia Nietzche.
Na DebConf, que não tem uma comunidade especificamente técnica, mas alguns desses goiabas que gostam do assunto político ao invés do técnico, então isso não fugiu do roteiro. Como sempre, um tipo de "saia justa" pra ele, que se saiu muito bem (ao meu ver) com um "respeito não é algo que se ganha, mas que se conquista". E isso é especialmente quando alguém tenta mexer no kernel que ele criou.
Linus comentou sobre outras coisas, como SELinux, que usa um framework de segurança no kernel (e que de acordo com ele torna tudo mais lento), mas o melhor é assistir ao vídeo.
Usually I don't open my own site (and blog) for other posts than mine.  But I received a request to do that.  I read the post and found it quite interesting, and bringing a new insight about the recent controversies in Linux world.

So I opened this possibility and here the article is.  It isn't my own, but I agree with several points showed here.

Helio

----

The New Mobile Scene and The Old Linux GNU/Linux Naming Controversy
Two Objectives and Four Conclusions


This document is licensed under the “Creative Commons – Attribution-ShareAlike 3.0”

Copyright (C) 2011

Some rights reserved.
Additional information can be found at:
http://creativecommons.org/licenses/by-sa/3.0/us/

Marcio Barbado, Jr. (marcio.barbado [AT] bdslabs.com.br)
Twitter     https://twitter.com/mbjunior


Contents


1- Introduction
  1.1- Why was RMS imprecise/incomplete?
  1.2- Why was RMS incoherent?
2- PoC
3- Conclusions
4- Final remarks
5- References


1-  Introduction

"... My name's Pitt, and yo ass ain't talkin' your way outta this shit!..." [1] [2]

  Poor rhetoric attempts as the one used to fool Jules (Samuel L. Jackson) in that grand Pulp Fiction movie are not going to work [1] [2]. It is time for contraposition, and refining concepts. Someone has to do this dirty job.
  There is this great barrier from the FOSS community in resuming this unresolved issue. Now, mobile technologies' evolution brought the subject back. Google's Android, specifically, which is held as one great success case, derived from the 20-year-old Linux kernel.
  Present writer was described by colleagues as "obsessed", simply because of this need for bringing to light an issue that deserves review, in the face of one renewed technological scene.
  Firstly, it is important to mention this text's author sees the Free Software Foundation as one of the world's most respectable institutions. Thus, the content herein intends not to attack the GNU Project. Rather, going deeper into the old "Linux GNU/Linux naming controversy" — this time with new parameters, are necessary as a means to safely reach 2 main objectives:

  i-	to seek an unbiased and universal term to use with Linux kernel based systems
	("whole systems" in general); and

  ii-	to briefly analyze Google, into the FOSS scene
	(including the referred corporation's strategy to use FOSS and make money).

  The reflection exposed in these lines seeks unbiased answers, and by the end, 4 new important conclusions are presented to the reader.
  Then let this arguing start by remembering some FOSS community members claim one should not use the "GNU/Linux" term, the same way "Windows NT" is not used for recent Windows' versions. That is merely a proprietary-case analogy, not a real argument.
  Groups supposedly for the "GNU/Linux" name strangely classify debates on this matter as a mere waste of time.
  However, linguistics matters as it conducts and exposes thoughts and impressions for some given historical moments, and thus, it not only documents history, but it helps in understanding the present for a sensible progress. In this sense, great importance should be given to the referred naming dispute's dynamics.
  Asked whether one should always make use of the GNU/Linux term, Richard Stallman states as a generic rule:

"... Not always — only when you're talking about the whole system. When you're referring specifically to the kernel, you should call it “Linux”, the name its developer chose.

When people call the whole system “Linux”, as a consequence they call the whole system by the same name as the kernel. This causes many kinds of confusion, because only experts can tell whether a statement is about the kernel or the whole system. By calling the whole system “GNU/Linux”, and calling the kernel “Linux”, you avoid the ambiguity..." [3]

  It would be impossible to start any kind of analysis without commenting the second paragraph, which assumes an absolute imbecility reigns in the human mind, reducing us to such a retarded condition, we would never be able to provide a clarification on a given conversation, like: "Linux, the kernel" or "Linux, the system".
  Now note the alleged confusion could be easily resolved. And of course, an "expert" would not be needed to achieve such. That, if RMS was not just playing with the word “experts”. Even the average Joes are not “hosts”, whose operating systems require name servers and aliases to get better working results. Humans achieve amazing solutions in dialoguing.
  And back to Mr. Stallman’s answer’s 1st part. Basically, a kernel is one significant operating system’s component, for it makes possible communication between hardware and applications. Therefore, the Linux kernel takes responsibility for instance in brokering “communications” between web browser and networking hardware on a Linux-based operating system.
  As a matter of fact, just like the UNIX kernel, being a traditional monolithic kernel, the Linux one is already an operating system. It concentrates so many “mediation responsibilities” (system calls and etc) [4].
  And Richard Stallman, who likes not monolithic architectures (as one can infer from Hurd’s [5]), has stated an official answer leading to misinterpretation for it is imprecise/incomplete and incoherent [3].

1.1-  Why was RMS imprecise/incomplete?
  Mr Stallman's words make it seems that every operating system based on the Linux kernel should be called a GNU/Linux system. There is not a clear explanation as to the need for GNU applications' support, which does constitute a prerequisite for what he wants.
  Lastly, RMS should have clarified his statement was based on the fact that, since the early 90s, Linux kernel itself has been mostly compiled with GCC, one very important program, maintained by the GNU Project [6]. But GCC's use in compiling the kernel, which had already reached its “3.x” releases series [7] [8], is not a rule today. Take LinuxDNA for instance, which is compiled with Intel’s ICC, a compiler regarded as a superior performance tool when compared to GCC in compiling the Linux kernel [9] [10] [11].

1.2-  Why was RMS incoherent?
  The argumentation used by RMS gets much more nebulous and contradictory when considering the inconsistencies observed in his answer to an Android related question:

"... There are systems that contain Linux and not GNU; Android is an example. Android is very different from the GNU/Linux system — because it doesn't contain GNU, only Linux. In effect, it's a totally different system. If you   think of the whole system as “Linux”, you find it necessary to say things like, “Android contains Linux, but it isn't Linux, because it doesn't have   the usual Linux [sic] libraries and utilities [meaning the GNU system].” Android contains just as much of Linux as GNU/Linux does. What it doesn't have is GNU...." [12]

  Basically, RMS performs a linguistic “deadlock”, such is the response’s confusion, using — among all that "poetical" construction, the "[sic]" adverb in something created by himself.
  But wait, there is more.
  When asked about the importance of his preferred terminology, Stallman writes:

“... Although the developers of Linux, the kernel, are contributing to the free software community, many of them do not care about freedom. People who think the whole system is Linux tend to get confused and assign to those developers a role in the history of our community which they did not actually play. Then they give inordinate weight to those developers' views...” [13]

  To start with, had Stallman any respect for his own terminology, it would be needless to write “Linux, the kernel” — which by the way is exactly what this text recommends, since he says the word Linux, alone, should refer to the kernel, uniquely. The “preacher” does not practice his doctrine for he clearly understands the inconsistency he would incur. Moreover, even by disregarding that, if RMS was correct, he would also be a bit partial.
  Note that if a supposed and lopsided historical debt would be the pillar for such insistence on language error, that is, using the GNU/Linux term whatsoever the context, one could always remember that GCC for instance, should be called EGCS/GCC because it would be important to exhibit in an explicit manner the beneficial influence brought by the EGCS (pronounced “eggs”) experiment into GNU’s notorious compiler’s development [14].
  However, by the time it bowed to EGCS in 1999, GCC changed its name, without initials changing. The “GNU C Compiler” name became “GNU Compiler Collection”, and no direct reference to EGCS was ever given.

2-  PoC
  Let's try to apply the referred Stallman's "rule" [3] to Google's Android "whole system", which is built upon the Linux kernel [15].
  By removing Android's kernel, which, by the way, is compiled with this Bionic software, not GCC [16], there is nothing but not-GPL-licensed code.
  No support to GNU Project's main libraries such as the GNU C Library (glibc) [17], containing standard C libraries. Not even the alternative uClibc was used.
  In fact, the Bionic libc was developed because there was this necessity for a BSD licensed C library [16].
  As a result, the "rule" fails because Stallman's statement is too generic.
  It fails with one of the most prominent projects built upon the Linux kernel.

3-  Conclusions
  Stressing that this text wants not to awaken the wrath of those Free Software Foundation's "enthusiastic parrots" (I mean those hallucinated kids who just repeat everything they hear and read from the FSF) — a minority in there, for good, it is clear one is not that "free" with Google's Android OS, and using the "GNU/Linux" term for it, following the referred generic rule, would be a gross error.
  Notwithstanding, the following conclusions are completely unbiased, and prove that Richard Stallman's official statements on the controversy are inaccurate and incoherent [3] [12]. A conceptual “update” is needed.

Conclusion i
Free as in jail. Android is NOT a GNU/Linux OS but a Linux OS, or a Google/Linux OS. And some like to call it an Android/Linux OS. And above their concerns with "fragmentation" — which would already attack Freedom number 3 (the forking freedom), Google is now making this move towards BSD licensing in their C libraries to Android.
The kernel they use is not even compiled with GCC [16], the main GNU program according to Linus Torvalds [18].
Conclusion ii
By using the "Linux" term — even for "whole systems", one is NEVER gonna go wrong. It's a universal categorization. But in case one decides to use GNU/Linux with nowadays most successful Linux kernel's derived project (Android), he is certainly gonna go wrong.
In fact, more than a mistake, that categorization would be unfair with the ideals within GNU/Linux systems.
Conclusion iii
It is interesting to study how Google make money with FOSS, besides, obviously, with workforce’s exploitation. As any genuine corporation, they seek profits, not FOSS activism. And seeing them as FOSS fighters is one appalling demonstration of naivety.
Conclusion iv
Just because one does not say "GNU/Linux" as a rule for "whole systems", it doesn't mean he does not know or respect the GNU Project, which, in turn, urgently need to update their philosophy, taking corporations’ moves into account.
And Stallman is an excellent and respectable leader, not a prophet, as "computer science" refers to something fairly noticeable in the name itself: science; it does not refer to religion.

4-  Final remarks
  This material is also the result of social interactions achieved on the "Identi.ca" microblogging service between MAY 22nd and 23rd, 2011.
  Interestingly, on JUNE 1st, 2011, nine days after the referred interactions, this respected Brazilian FOSS activist, Alexandre Oliva, who’s on “Identi.ca” as well, wrote a few lines on the naming controversy [19].
  Alexandre is sort of a sub-celebrity. He attends most of tech events in Brazil — one diligent man. And as a member of “FSF Latin America” [20], of course he argued in favor of his “prophet”.
  Good parrot, a respected one. He used his text to sickeningly repeat Stallman. Worst: either caused by a topsy-turvy dialectical insight or by a desperate attempt in gaining recognition, referred psittacine — terribly indoctrinated, enhances his mumbo-jumbo citing reference “[6]” (which had also been through “Identi.ca”) as a support for his arguing, insisting upon a 20-year-old deprecated context, ignoring all of the historical and technological unfoldings mentioned here.
  As a reference within Brazilian free software community, he somewhat constitutes an evidence of referred country's difficulty in promoting and coordinating legitimate local movements.
  Formulating original proposals based upon local reality may sound like a no-brainer platitude to some foreign social circles, but there seems to be this sense of inferiority amongst Brazilians, a psychological barrier once called “the mongrel complex”. Lack of identity may actually be referred people's identity after all. Many of our exponents — even capable of combating local blemishes, adhere to elsewhere causes in a subservient way.
  Oliva is a computing guru himself but chooses intellectual cowardice as a refuge. Owning ability to publicly inquire Stallman, he opts to unconditional obedience, this way gaining position and honorable mentions. Employee of the month politics, properly fed egos, subordinates under control.
  Mentioned situation keeps computing community away from critical thought. If point is straight repetition, we already got CTRL+C CTRL+V, recorders and Psittaciformes.
  It resembles mathematics. There is a rule. One finds some exception case(s), and all of a sudden, there's no rule anymore. Meaning that computer science is not like sports games, and enthusiastic postures may hamper its complete understanding.

  So, this text expresses the results of a quest for the least biased and most universal term to use with Linux kernel derivatives. Android's detestable case shows this is "Linux".

"... And I will strike down upon thee with great vengeance and furious anger, those who attempt to poison and destroy my brothers!..." [1] [2]

5-  References

[1]	Pulp Fiction (1994) – IMDb:
http://www.imdb.com/title/tt0110912/

[2]	Pulp Fiction - Ezekiel 25:17


[3]	Should we always say “GNU/Linux” instead of “Linux”?
http://www.gnu.org/gnu/gnu-linux-faq.html#always

[4]	Modern Operating Systems / Andrew S. Tanenbaum

[5]	GNU Hurd:
http://www.gnu.org/software/hurd/

[6]	Notes for linux release 0.01:
http://www.kernel.org/pub/linux/kernel/Historic/old-versions/RELNOTES-0.01

[7]	Linux Kernel Mailing List - Re: (Short?) merge window reminder:
https://lkml.org/lkml/2011/5/23/405

[8]	3.0-rc1 log:
http://www.kernel.org/pub/linux/kernel/v3.0/testing/ChangeLog-3.0-rc1

[9]	LinuxDNA:
http://www.linuxdna.com/

[10]	LinuxDNA Supercharges Linux with the Intel C/C++ Compiler:
http://www.linuxjournal.com/content/linuxdna-supercharges-linux-intel-cc-compiler

[11]	Intel’s compilers and libraries:
http://software.intel.com/en-us/articles/intel-compilers/

[12]	Can't there be Linux systems without GNU?
http://www.gnu.org/gnu/gnu-linux-faq.html#justlinux

[13]	Why is the name important?
http://www.gnu.org/gnu/gnu-linux-faq.html#whycare

[14]	History – GCC:
http://gcc.gnu.org/wiki/History

[15]	Android's kernel patches:
http://android.git.kernel.org/

[16]	Patrick Brady dissects Android:
http://www.zdnet.com/blog/burnette/patrick-brady-dissects-android/584

[17]	GNU C Library:
http://www.gnu.org/software/libc/


[18]	Linus Torvalds on GNU/Linux:


[19]	GNU and Linux grew together and supported each other!
http://lwn.net/Articles/445646/

[20]	Alexandre Oliva:
http://www.fsfla.org/~lxoliva/
![]()
Apesar de adorar Debian e Ubuntu, o trabalho me exige mexer com pacotes RPM. Ao contrário do format DEB, os pacotes RPM são mais simples de gerar. Basta ter um arquivo SPEC, que informa os dados dos pacote como dependência e scripts para instalação, que é possível gerar usando rpmbuild. Mesmo num Debian/Ubuntu.
Mas cai no caso de uma aplicação de opensaf já compilada. E precisava gerar um pacote só com versão diferente, pra testar uma campanha de upgrade. A solução seria desmontar o pacote RPM e montar novamente. Um "unrpm" por assim dizer. Eu tentei usar um pacote "rpmrebuild", mas o mesmo é feito pra sistemas já com uso de RPM, e precisa que o pacote esteja instalado pra conseguir reconstuir o mesmo. Com certeza não o meu caso.
A parte do conteúdo não é difícil de fazer pois o pacote RPM é na verdade um arquivo de CPIO. Usando como exemplo o pacote aalib-libs do fedora 20, com comandos rpm é possível ver as informações do pacote e seu conteúdo:
helio@debian:~$ rpm -qip aalib-libs-1.4.0-0.23.rc5.fc20.x86_64.rpm
warning: aalib-libs-1.4.0-0.23.rc5.fc20.x86_64.rpm: Header V3 RSA/SHA256 Signature, key ID 246110c1: NOKEY
Name : aalib-libs
Version : 1.4.0
Release : 0.23.rc5.fc20
Architecture: x86_64
Install Date: (not installed)
Group : System/Libraries
Size : 159154
License : LGPLv2+
Signature : RSA/SHA256, Fri 16 Aug 2013 05:21:44 PM CEST, Key ID 2eb161fa246110c1
Source RPM : aalib-1.4.0-0.23.rc5.fc20.src.rpm
Build Date : Sat 03 Aug 2013 02:17:12 AM CEST
Build Host : buildvm-07.phx2.fedoraproject.org
Relocations : (not relocatable)
Packager : Fedora Project
Vendor : Fedora Project
URL : http://aa-project.sourceforge.net/aalib/
Summary : Library files for aalib
Description :
This package contains library files for aalib.
helio@debian:~$ rpm -qlp aalib-libs-1.4.0-0.23.rc5.fc20.x86_64.rpm
warning: aalib-libs-1.4.0-0.23.rc5.fc20.x86_64.rpm: Header V3 RSA/SHA256 Signature, key ID 246110c1: NOKEY
/usr/lib64/libaa.so.1
/usr/lib64/libaa.so.1.0.4
/usr/share/doc/aalib-libs
/usr/share/doc/aalib-libs/COPYING
/usr/share/doc/aalib-libs/ChangeLog
/usr/share/doc/aalib-libs/NEWS
/usr/share/doc/aalib-libs/README
Com o comando rpm2cpio seguido de cpio, é possível verificar que o conteúdo é o mesmo, sem perdas.
helio@debian:~$ cat aalib-libs-1.4.0-0.23.rc5.fc20.x86_64.rpm | rpm2cpio - | cpio -itv
lrwxrwxrwx 1 root root 14 Aug 3 2013 ./usr/lib64/libaa.so.1 -> libaa.so.1.0.4
-rwxr-xr-x 1 root root 125872 Aug 3 2013 ./usr/lib64/libaa.so.1.0.4
drwxr-xr-x 2 root root 0 Aug 3 2013 ./usr/share/doc/aalib-libs
-rw-r--r-- 1 root root 25265 Apr 26 2001 ./usr/share/doc/aalib-libs/COPYING
-rw-r--r-- 1 root root 3649 Apr 26 2001 ./usr/share/doc/aalib-libs/ChangeLog
-rw-r--r-- 1 root root 764 Apr 26 2001 ./usr/share/doc/aalib-libs/NEWS
-rw-r--r-- 1 root root 3604 Apr 26 2001 ./usr/share/doc/aalib-libs/README
314 blocks
Para extrair o conteúdo, bastaria usar as opções "-idv" do cpio.
Mas ainda falta os scripts de instalação que fazem a parte de pré-instalação, pós-instalação, pré-remoção e pós-remoção. Como escolhi um pacote de biblioteca, esses não precisam de algo assim. Pegando um pacote de servidor, no caso o bind - servidor de dns, é possível ver esses scripts que compões o SPEC. Basta usar o comando "rpm --scripts -qp <pacote>".
helio@debian:~$ rpm --scripts -qp bind-9.9.4-8.fc20.x86_64.rpm
warning: bind-9.9.4-8.fc20.x86_64.rpm: Header V3 RSA/SHA256 Signature, key ID 246110c1: NOKEY
preinstall scriptlet (using /bin/sh):
if [ "$1" -eq 1 ]; then
/usr/sbin/groupadd -g 25 -f -r named >/dev/null 2>&1 || :;
/usr/sbin/useradd -u 25 -r -N -M -g named -s /sbin/nologin -d /var/named -c Named named >/dev/null 2>&1 || :;
fi;
:;
postinstall scriptlet (using /bin/sh):
/sbin/ldconfig
if [ $1 -eq 1 ] ; then
# Initial installation
/usr/bin/systemctl preset named.service >/dev/null 2>&1 || :
fi
if [ "$1" -eq 1 ]; then
# Initial installation
[ -x /sbin/restorecon ] && /sbin/restorecon /etc/rndc.* /etc/named.* >/dev/null 2>&1 ;
# rndc.key has to have correct perms and ownership, CVE-2007-6283
[ -e /etc/rndc.key ] && chown root:named /etc/rndc.key
[ -e /etc/rndc.key ] && chmod 0640 /etc/rndc.key
fi
:;
preuninstall scriptlet (using /bin/sh):
# Package removal, not upgrade
if [ $1 -eq 0 ] ; then
# Package removal, not upgrade
/usr/bin/systemctl --no-reload disable named.service > /dev/null 2>&1 || :
/usr/bin/systemctl stop named.service > /dev/null 2>&1 || :
fi
postuninstall scriptlet (using /bin/sh):
/sbin/ldconfig
# Package upgrade, not uninstall
/usr/bin/systemctl daemon-reload >/dev/null 2>&1 || :
if [ $1 -ge 1 ] ; then
# Package upgrade, not uninstall
/usr/bin/systemctl try-restart named.service >/dev/null 2>&1 || :
fi
Com essas informações é possível construir um pacote RPM binário. Claro que no caso isso não é necessário pois bastaria pegar o pacote SRC e fazer o build novamente. No meu caso, eu não sabia onde estavam os fontes e essa forma foi muito mais rápida, ainda mais que eu só precisava modificar a informação de versão pra testar upgrade.

É comum encontrar em fóruns algumas discussões acaloradas sobre o uso do termo "GNU/Linux" ao invés de "Linux", e que o mesmo não seria o que é, pois é somente um kernel, sem o GNU.
Concordo em número, gênero e grau sobre a importância do GNU na história do software livre, e mesmo na do Linux. Sem a influência de liberdade, Linus nunca teria pensado em ter um sistema completamente aberto. Mas será mesmo que ele precisava das ferramentas da GNU, ou de outro modo não conseguiria sair do zero?
Em uma entrevista de 1993, Linus Torvalds comenta que não teria nem tentando criar o Linux se o 386BSD existisse.
Pra quem não lembra, Linux foi criado em 1991, enquanto que o FreeBSD apareceu somente em 1993. Onde estava o BSD esse tempo todo?
Em 1991, Berkeley estava sofrendo um processo judicial por parte da AT&T, a dona do código fonte do UNIX, que tinha compartilhado com Berkeley durante sua origem, nos anos 70. O UNIX BSD sempre fora distribuído gratuitamente, e com códigos fontes abertos e livres, sob a licença BSD. Enquanto a AT&T tinha o UNIX como um projeto de laboratório, uma brincadeira dos engenheiros, isso não importava muito. Mas no final da década de 80 o UNIX já era muito difundido e usado tanto nas universidades quanto fora delas. Quando a AT&T chegou ao fim de seu contrato de monopólio das telecomunicações, ela simplesmente resolveu comercializar seu UNIX. E como lidar com o seu concorrente livre, o BSD? Não teria problema se continuasse dentro das universidades, mas existia uma empresa que vendia um UNIX derivado do BSD, o BSDi. Então entra um processo judicial no meio do caminho.
BSD estava na sua versão 4, que incluia o stack recém criado de redes, o TCP/IP. O processo terminou em 1992, quando foi feito um acordo em que o código BSD seria re-escrito sem a parte que pertencia à AT&T. Surgia a especificação 4.4BSD-lite. Nessa época, a revista Dr.Dobbs iniciou uma série de artigos que vinham com o código pra ter o BSD rodando em computadores com o processador i368. Era o surgimento do 386BSD.
Mas o 386BSD tinha o problema de ter dono, Lynne Jolitz e William Jolitz. Apesar do código estar totalmente publicado e permitir qualquer um compilar seu próprio UNIX BSD, era preciso passar quase 2 dias aplicando patches de voluntários pra ter o sistema atualizado e funcional. Nesse ambiente sugiram os sistemas FreeBSD e NetBSD, como uma forma mais colaborativa de participação e manutenação do código.
E o GNU?
Nesse meio tempo entre 1990 e 1993, pode-se dizer que os UNIX BSDs praticamente pararam seu desenvolvimento. Eles existiam dentro de máquinas PDP, os mini computadores da época, mas não nos computadores pessoais, que era o que Linus usava em casa pra programar. Os BSDs precisavam do GNU? Precisavam mas não do GNU como um todo. Eles usavam o compilador GCC, que foi um dos marcos mais importantes do software livre. O restante, dos comandos básicos ao kernel, já tinham em BSD. Linux é um kernel enquanto que FreeBSD é um sistema operacional completo. E descendente direto do UNIX.
Se Linus tivesse começado um pouco depois, em 92, ele poderia ter construído o Linux em cima de uma base BSD. E continuaria um software livre. Vantagens? Acho que talvez mudasse o licenciamento pra BSD, mas provavelmente seria muito semelhante com o que temos hoje.
Possível, é. Valeria o esforço? Eu diria que não. Linux funciona muito bem com a parte GNU. Se um dia surgisse algum problema de licenciamento, o que é impossível com softwares da GNU, ele poderia eventualmente ter um esforço pra mudar.
Benefícios de desempenho? Acho que também não. Apesar dos BSDs terem um stack de rede com desempenho superior ao do Linux, isso não é imutável e frequentemente acontece de um passar o desempenho do outro. Recentemente o Facebook anunciou uma iniciativa de melhorar o stack de rede do Linux pra igualar ao do FreeBSD. Eu espero que supere, pra assim o grupo do BSD ter um objetivo pra melhorar mais :-)
E os BSDs não estão na frente em tudo. O próprio "grep" da GNU é muito mais rápido e eficiente que seu semelhante BSD, pra listar apenas alguns.
Então, antes de dizer que Linux não seria nada sem o GNU, lembre dos BSD. Atualmente nem o compilador é mais o GCC, sendo um sistema operacional totalmente funcional sem precisar necessariamente do GNU. E 100% software livre.
Atualização: Tue Aug 19 18:30:18 CEST 2014
Eu esqueci completamente de comentar (obrigado pelo lembrete Bruno Máximo) mas o Android é um kernel Linux sem GNU, totalmente feito em cima de BSD. E sim, o desempenho é muito bom.
 Não é de hoje que ouço esses termos como "saia das redes devassas" ou "abandone as empresas nefastas" quando se trata de Facebook ou Google.
Em certo ponto acho mesmo que existe um certo nível de devassidão nelas, assim como são um pouco nefastas.
Mas também acho que têm muitas coisas que são ignoradas.
O Facebook é uma empresa que contribui muito pro software livre. E não estou falando de contribuição em dinheiro somente, mas com código. É dela o banco de dados Cassandra e o sistema de análise de dados Handoop. E foi o Facebook que abriu novamente os olhos do mundo pro potencial da linguagem Erlang. E tem mais os projetos de datacenters ecologicamente corretos, e o projeto de hardware livre, aplicando os conceitos de liberdade do software livre em, quem diria, hardware! Coisa que até o próprio Stallman sempre disse não ser parte do foco de software livre.
E o Google? Google apadrinhou fortemente o python, tendo contratado seu patrono Guido Van Rossum. E não só ele. Grandes nomes da computação trabalham ou trabalharam pro Google. Ou trabalharão. Eles criaram a linguagem Go. Mantém o banco de dados NoSQL HBase e diversos outros software livres. Apesar de ser dona do navegador Chrome, é a maior patrocinadora da Fundação Mozilla, que produz o navegador Firefox. E também foi quem tirou o Linux da escuridão através do Android, fazendo o pinguim se tornar o sistema operacional de sistemas móveis mais usado no mundo (85% dos dispositivos pela última pesquisa que vi).
E essas são apenas algumas demonstrações. Existem muitas mais de ambas empresas como de outras com o mesmo perfil.
Esse assunto mistura um pouco de paranóia. Se formos levar ao pé da letra, sim somos monitorados. Mas não da forma individual: somos vistos como massa. É quase pensar que seu uso do cartão de banco é monitorado pra saber seu perfil de gasto e o banco te oferecer coisas pra gastar mais. Existe isso? Existe com análise de um grupo. Pessoas individualmente não são interesse de nenhuma empresa. Ninguém quer saber que horas você vai ao mercado. Mas descobrir que a maioria das pessoas vai ao mercado às terças-feiras entre 18:00 e 19:00, isso é uma informação que pode melhorar muita coisa. Não somente fazer as pessoas comprarem o estoque de coca-cola encalhada, mas se planejar pra ter estoque dos produtos mais comprados. Antes que perguntem, isso que escrevi é chute.
Com volume de dados, torna-se importante e uma grande ferramente de análise nos perfils de uso de tudo. Absolutamente tudo. Mas ter os dados basta? Em geral não. Do contrário a cidade de São Paulo já teria eliminado a criminalidade com a base de dados de ocorrências que tem. Um fator importante que aparece junto mas muita gente não percebe é a análise desses dados, pra transformar em informação útil. Isso pouca gente tem e não abre. É como receita de pizza: todo mundo sabe os ingredientes e como é uma pizza, mas fazer a pizza e com aquele sabor gostoso, não é pra qualquer um.
E a privacidade? Como a pessoa que apagou uma foto no facebook vê a foto exposta novamente? Nesse caso vem a parte de bancos de dados. Lembra quando usávamos e-mail e era chato receber aquelas apresentações em powerpoint anexadas? Qual era o lado ruim? Primeiro que se recebia uma, duas, dez vezes o mesmo powerpoint vindos de mails diferentes. Segundo que cada powerpoint consumia espaço em disco. Ou seja, ao receber um powerpoint de 10 MBytes, e depois 10 vezes o mesmo, já se foram 100 MBytes de disco. Parece fichinha hoje em dia, mas isso era chato e irritante não muito tempo atrás. E não só pelo espaço em disco, mas pelo tempo de transmissão de dados.
Pra contornar esse tipo de replicação parasita do dados, criou-se um aparato de "deduplicação", ou seja, remover a duplicidade de dados que existem. No caso de redes sociais, isso foi inserido num banco NoSQL. O resultado é que cada vez que se carrega uma foto, essa foto ficar armazenada no sistema, mas quando alguém carrega a mesma foto, o sistema ao invés de carregar novamente, verifica se ela já existe, descarta esse armazenamento e apenas mostra pra você o resultado já armazenado. Isso economiza um planeta inteiro de espaço em disco, mas... tem consequências. Como várias pessoas tem o mesmo arquivo como delas, tem de existir um sistema bastante complexo de permissões, pra que certas pessoas (as que carregaram a imagem, ou copiaram, ou fizeram compartilhamento) possa ver o conteúdo e outras não. Então ao se apagar um conteúdo, a menos que não exista mais ninguém com ele compartilhado, ele deixa de existir no banco de dados. Invariavelmente as pessoas descobrem que conteúdos ainda existem ou por falha nesse controle complexo de acesso (somos todos humanos) ou pelo conteúdo ainda existir e estar relacionado com outro dono.
Então qual o motivo dos ativistas reclamarem tanto dessas redes? Eu acho que existe um momento histórico que passou e eles não perceberam. Sabe aquele cara de 40 anos, tiozão, que se veste como adolescente? No estilo do cantor Chorão? Mais ou menos isso.
O software livre nasceu e cresceu dentro de universidades. Linus Torvalds criou o Linux durante a faculdade. BSD veio de um laboratório de pesquisas de Berkeley. Ambiente gráfico X veio de MIT. Nesse contexto e época ninguém pensava em dinheiro. Ou causa. Muito menos em consequência. Era software livre pela liberdade. Liberdade de ler o código e contribuir, de melhorar, de ousar. Foi mais ou menos como os hippies com o movimento de contra-cultura, só que a oposição era ao movimento do software fechado, proprietário, de programadores de terno e seus horários fixos. Essa era a luta pela liberdade.
Mas estamos em 2014. Vencemos. Software livre não é mais um jargão de loucos: é realidade. As empresas já adotam de início projetos com código livre. Já publicam no github ou em seu próprio repositório.
E qual é o problema então? Dinheiro. No surgimento e crescimento do software livre, não existia um foco em dinheiro. Era tudo por diversão. Agora não. Não mais. Existe foco, escolha, modelo de negócios e tudo mais. Aparentemente isso trouxe à tona dores de cotovelos daqueles que acham que o software livre devia continuar como era, num espírito universitário, sem grandes compromissos ou financiamentos. Gritam "sejamos livres" quando na verdade deviam gritar "façam por amor, mas não façam por dinheiro".
Todos esperávamos viver de software livre, pois amávamos o software livre. E as empresas? Elas deviam sair do modelo proprietário e adotar o software livre. Mas e ganhar dinheiro? Elas podiam? Ninguém perguntou isso não época. E elas podiam. Aliás, podem. E isso traz o rancor de quem acha que isso é proibido, uma ferida que não cicatriza no software livre.
E chegamos no grande dilema. O software pode ser livre, e até gratuito, mas nossa conta de luz não é. Nossos brinquedos do DealExtreme não são. E nossos laptops último modelo também não são. Precisamos de dinheiro.
Quando somos desenvolvedores, as formas são ou vendendo seu serviço, seja como empregado ou como consultor, ou abrindo uma empresa e sendo empreendedor.
E como uma empresa pode ganhar com software livre? Uma forma é vender serviços, como manutenção e mesmo treinamento. Mas são essas as únicas opções? Não. Uma forma simples é... vender marketing. E é ai que se inserem Facebook e Google e tantas outras empresas "devassas" ou "nefastas".
Pode não ser uma maneira que todo ativista de software livre gostaria de ver uma empresa ganhar dinheiro com software livre, mas é algo que funciona. E funciona bem. Funcionou com os modelos de canais de TV que chamamos de "abertas". Ambas pegam a massa de pessoas que usam seus aplicativos, que se baseias em software livre, e usam essa massa de dados pra venda de propaganda.
Eu acho que é um contraponto justo e honesto. Não estou sendo roubado ou manipulado por nenhuma dessas empresas. Em troca, tenho um serviço de e-mail com tamanho absurdamente grande de 15 GB. E sem pagar absolutamente nada. Se eu quiser trocar pra um servidor de e-mails meu, tenho de desembolsar USD 5/mês na Digital Ocean e cuidar da instalação e manutenção do servidor.
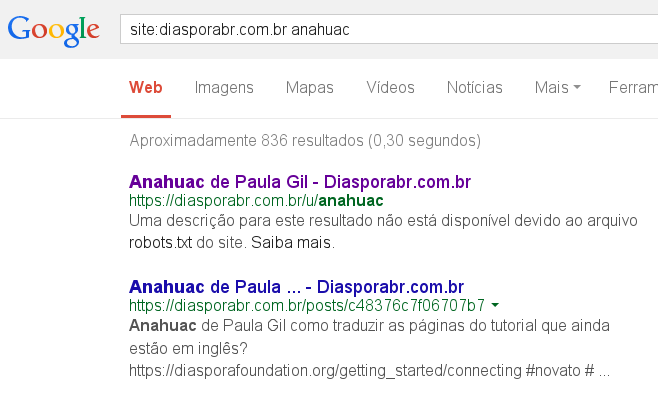
Existem alternativas às redes devassas e empresas nefastas? Se ainda acha que essas empresas são isso, existe sim. Pode usar como forma de ilusão a rede Diaspora. Ilusão? Eu diria que sim, pois o elo mais fraco de uma rede social não é seu código ou a empresa que a mantém, mas as pessoas. Elas são socias e gostam de publicar. Do contrário não seria possível ver que o maior expositor do Diaspora no Brasil, o Anahuac, já está indexado no Google.
E é preciso credibilidade no sysadmin desses sistemas, pois a sessão de conectividade é fechado até seu servidor, ou seja, quem tem acesso root consegue ler sua conexão. E seus dados. Mas fé remove montanhas, então é só acreditar.
Já o e-mail, por natureza, é um sistema inseguro. Suas mensagens trafegam sem nenhuma criptografia. Mas se deseja isso, já existe há muito tempo o PGP, Pretty Good Privacy, que serve tanto pra criptografar quanto pra assinar seus mails. No Linux, basta instalar o GPG, que é o Gnu Privacy Guard, a implementação GNU do PGP.
Mas se acha realmente ruim o Google fazendo algo como "grep" nos seus mails, pra oferecer propaganda baseada em seus conteúdos, pode optar pelo OpenMailBox. É um serviço que diz não ler seus mails, mas tem o contraponto de estar sofrendo de falta dinheiro. E pede doações. Então é bom doar sempre, ou corre o risco de ver o serviço fechar. Sim, não há garantias de continuidade. Backup? Não sei. Mas o importante que só você lerá seus mails.
E o rise up? Esse é um serviço ultra protegido pra seu sigilo e que já contem PGP local. Ou seja, sua chave privada fica confiada no servidor. Há garantias que ele vá existir no futuro? E backup? Não sei, mas ele é um serviço pra quem busca anonimato ao máximo. Então se abrir uma conta lá, conecte-se apenas através da rede TOR. E não use seu nome ou sobrenome. Do contrário, que adianta usar uma rede pra ter um mail anônimo se usa seus dados pessoais?
E outras redes? Existem várias alternativas. O problema é sempre esse: quem paga? Enquanto for um serviço de pequeno uso, com poucos usuários, pode até ficar numa universidade. Mas se um dia crescer, pra onde vai? Quem vai pagar? Como vai ser pago? Sempre que for usar um serviço ou rede social, sempre pense nesse ponto importante: quem paga a conta da energia elétrica do servidor? Quem faz o backup?
Quando eu vejo algumas pessoas trabalhando no Google ou Facebook, amigos ou colegas, eu gosto de pensar que sou eu quem financia aquilo ali. E com foto de gatinhos. Num bom sentido, claro.
Eu pessoalmente não acho um bicho de sete cabeças usar essas redes. Nem vejo como agressão ao software livre. Muito pelo contrário. É uma forma de financiar o desenvolvimento de software livre.
Mas quem se sentir tocado quanto sua privacidade, sempre existem alternativas. Mas esteja preparado pra colaborar, seja com código, seja com dinheiro, pois software livre depende de... software. Alguém precisa fazer.
Atualização: acabei de ler um artigo onde tanto o Yahoo quanto o Google vão fornecer criptografia através de PGP em seus serviços de mails. http://www.pcworld.com/article/2462852/yahoo-mail-to-support-end-to-end-pgp-encryption-by-2015.html
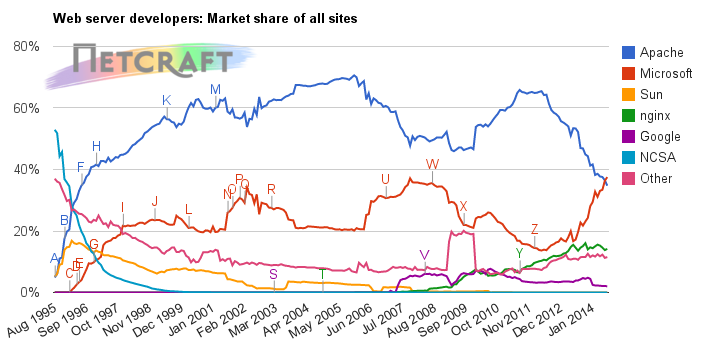
Como descrito e previsto anteriormente em "o último dos apaches", o servidor web IIS da Microsoft tornou-se o líder de mercado, de acordo com medições da Netcraft.
Netcraft's July 2014 Web Server Survey
Com isso chegamos ao fim de uma era de dominação do software livre. Claro que se somarmos as quantidades de servidores Apache e Nginx, teremos uma quantidade maior de servidores de software livre. Mas então teríamos de somar o IIS com os outros servidores proprietários, como Sun e NCSA.
Em números, a virada se deve à queda do uso do Apache, além do crescimento do IIS.
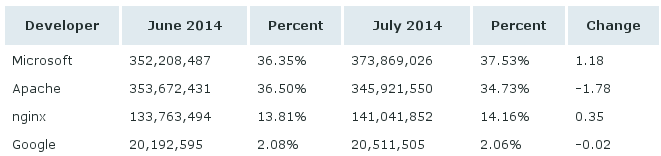
Em termos de sites realmente ativos, o Apache ainda continua líder, o que mostra uma certa "inflada" nesse número de servidores IIS.
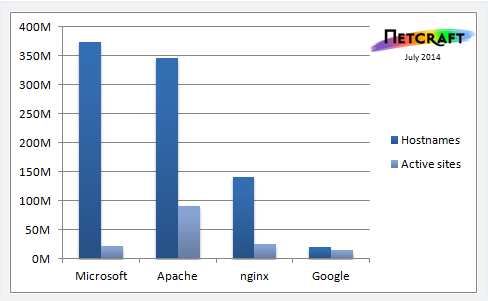
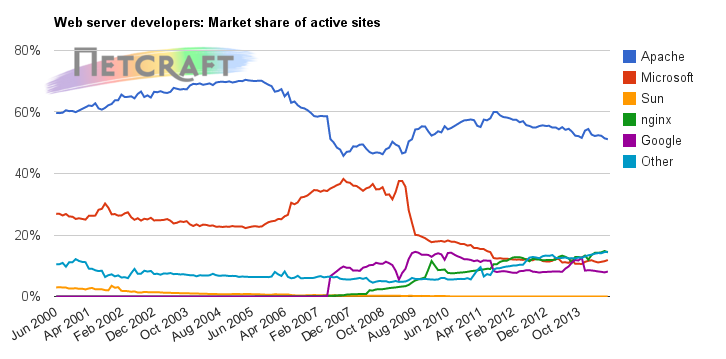
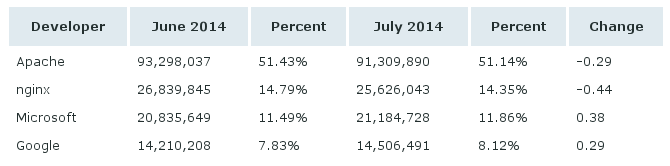
Ainda de acordo com a Netcraft, essa inflada do IIS nos últimos tempos se deve aos sites chineses, principalmente os de compras, que apesar de serem chineses, estão hospedados em servidores americanos. Imagino que seja por conta dos serviços de cloud disponíveis por lá.
Fui verificar se meu querido site DealExtreme está entre os chineses que adotaram Microsoft, mas pude ver pelo Netcraft que ele está firme e forte com Linux.
Então posso continuar com minhas compras e com consciência tranquila.
Já outro dado que vi na Internet, e que aliás me faz lembrar de olhar o Netcraft, mostra que o uso de cloud Microsoft aumentou muito no último ano. Então esse efeito "inflado" de aumento de servidores, mas não ativos, deve ser com certeza o Azure.
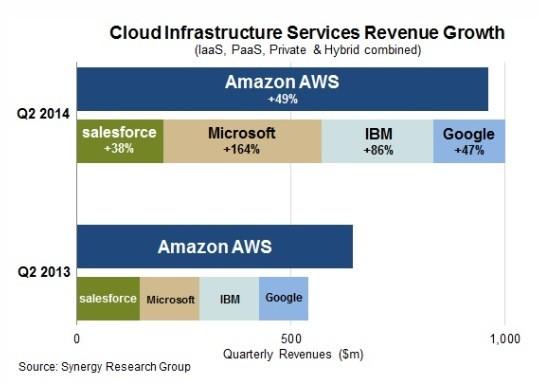
Seria isso um reflexo da melhor qualidade do IIS? Acho que não. Apache sempre liderou com folga esse espaço. Seria então por ser gratuito? Nesse quesito, o Amazon AWS também é por 1 ano. Então não acho que seja um espaço de "servidores de experimentação", de quem está aprendendo, mas de coisa profissional, de site de e-commerce mesmo, como é dito pela Netcraft. Mas qual o motivo de escolherem IIS? Eu acho que é falta de conhecimento aliada com forte propaganda da Microsoft - e cursos - de Azure e .Net. Muitas pessoas saem das universidades sabendo isso, e nem mesmo olham pra outra coisa. Azure e .Net de hoje é o VB e Delphi de 15 anos atrás. A diferença é que estão entrando numa área que era dominada pela qualidade do software livre, mas que agora será tomada pela quantidade de uso. Assim foi com o navegador Internet Explorer 6. Riscos? Teremos novamente padrões web ditados pela Microsoft.
2014 será marcado como o ano de grandes perdas. Falecimentos de grandes personagens da história, como o autores Ariano Suassuna e João Ubaldo, e morte da presença do software livre na web. E da web livre.
Estamos em risco.

Acho que ninguém percebeu, mas passei esses dias fora do ar. O site continuou em pé, mas simplesmente não conseguia fazer login.
Tentei tudo quanto é maracutaia no Joomla pra tentar conectar. Até descobri que dá pra criar uma senha nova direto no MySQL fazendo assim:
mysql> select username, password from j25_users where username = 'admin';
+----------+----------------------------------+
| username | password                         |
+----------+----------------------------------+
| admin    | 19a7a089e82e86fab221af066b524ce1 |
+----------+----------------------------------+
1 row in set (0.00 sec)

mysql> update j25_users set password = MD5("pastel de flango flito") where username = "admin";
Query OK, 1 row affected (0.08 sec)
Rows matched: 1  Changed: 1  Warnings: 0

mysql> select username, password from j25_users where username = 'admin';
+----------+----------------------------------+
| username | password                         |
+----------+----------------------------------+
| admin    | 42510c674bf98493cc5647ac6e573740 |
+----------+----------------------------------+
1 row in set (0.00 sec)
Mas não consegui conectar. Vi que tem muita gente reclamando do mesmo problema nos fórums do Joomla, mas nenhuma das soluções funcionou pra mim. No fim tive de restaurar um backup, que aliás pretendo escrever logo sobre, pois é algo de extraordinário de tão fácil.
Sobre a falha... bom, coisas de Joomla. Devo mudar de plataforma de CMS? Como parece que foi algo isolado, e aconteceu junto com o meu péssimo hábito de mexer nas configurações do site sem fazer backup, o erro foi mais meu que do Joomla. Então deve permanecer por aqui, pra desgosto dos amigos que gostam do Plone.

Pra quem pensou que estou falando de mim, pessoalmente, se enganou. Foi esse servidor aqui que mudou, onde está o site. Por isso um pouco de instabilidade esses dias, por culpa dos caches de DNS.
Estava usando uma hospedagem __friendly__ de um amigo, mas a mesma tinha algumas limitações. Claro que tinha muitas vantagens, que agora terei de cuidar pessoalmente, mas os benefícios da migração fazem a diferença:
Recomendo a todos a fazerem o mesmo? Talvez não. Dá trabalho. Eu nem olhava pra backup, ou proteção contra ataques DDoS. Agora tenho de cuidar disso. E desempenho. O servidor VPS onde estou hospedado agora tem menos performance e limitação de memória, CPU e banda, mas os acessos também não são lá tão altos assim. Acho que é uma troca que vale a pena.
Perco desempenho e comodidade, mas fico mais seguro e sem monitoração da NSA.
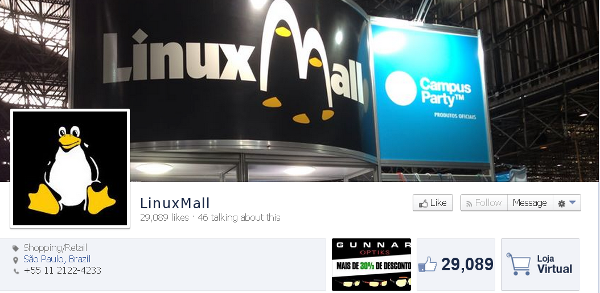
Nem só de discussões de licença, flamewares, releases de kernel e ativistas sapatênis vive o mundo do software livre. Às vezes é envolto de mistério também. Um dos enigmas recentes foi o sumiço da LinuxMall, loja virtual de produtos relacionados com o mundo de software livre e computação em geral. Era a nossa thinkgeek brazuca.
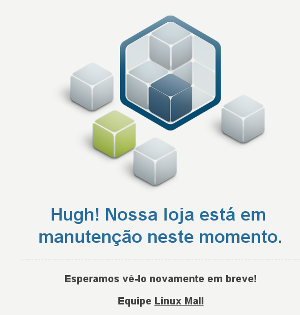
Uma reclamação de falta de entrega aqui, outra ali, e de repente, o site ficou fora do ar. Nenhuma explicação, nenhum comentário. Nada.
Seus últimos posts são de 6 de dezembro de 2013 em sua página no Facebook, e 3 de julho de 2013 no Twitter. Tentei o contato no telefone e... nada: número chamado não existe. Possivelmente desativado.
A LinuxMall, ou seu perfil, era uma figura bastante ativa no meio digital. Sempre respondendo no twitter, pedindo likes no facebook, e compartilhando fotos no flicker.
O que aconteceu?
Como não existe nenhuma notícia ou comentário, eu acho (então é pura suposição minha) que era um empreendimento de um dono só. Esse dono deve estar passando por algum problema, talvez doença, que não o possibilite voltar aos negócios. Se não foi algo pior, como um falecimento.
Sempre comprei na LinuxMall, de adesivos a canecas e camisetas. É realmente uma pena que tenha acontecido algo e simplesmente tenha desaparecido. Deixa um buraco numa comunidade sedenta por produtos com logotipos do pinguim ou do capetinha. Perdemos um parceiro na nossa identidade geek.
Ao dono, ou donos, desejo melhoras e que um dia possam voltar aos negócios.
Como todos os anos, esse foi mais um que consegui participar do FISL. Foi uma edição bem atípica por conta da copa do mundo, fazendo com que a data do evento mudasse de julho pra maio.
O resultado disso foi um FISL com menor participação de estudantes e professores, com área menor para palestras, e poucos estandes.
Alguns gigantes do mundo do software livre marcaram presença, como RedHat e Suse, mas outras não apareceram, como Intel e a própria Globo.com. Não que seja algum tipo de boicote, mas muitos eventos foram antecipados por conta da copa, causando esse tipo de efeito.
Mas falando mais do FISL, foi novamente um evento muito legal, onde pude encontrar amigos antigos e fazer novos. E sempre falando do mesmo assunto. E encontrar outros amigos virtuais, com quem só falava via Internet (em geral Facebook, mas só o Anahuac sofre com isso).
Agora resta saber se conseguirei participar no ano que vem.
Como sempre acontece, foram publicados os vídeos do FISL15. Eu, como bom nerd, baixei todos eles usando wget.
wget -nH -np -r --mirror http://hemingway.softwarelivre.org/fisl15/high/
Eu comecei baixando sem a opção "--mirror", mas como são 18 GB de vídeos, não consegui terminar no mesmo dia. E pra não sobrescrever, acabei usando esse parâmetro pra baixar somente os vídeos faltantes ou que estavam pela metade.
No fim acabei com um diretório com vídeos como esses:
sala40t-high-201405071002.ogv
sala40t-high-201405071059.ogv
sala40t-high-201405071200.ogv
sala40t-high-201405071309.ogv
sala40t-high-201405071400.ogv
sala40t-high-201405071505.ogv
sala40t-high-201405071559.ogv
sala40t-high-201405071704.ogv
sala40t-high-201405081002.ogv
sala40t-high-201405081059.ogv
sala40t-high-201405081201.ogv
sala40t-high-201405081302.ogv
E agora? Quem é quem? Olhar um por um na grade palestras do FISL15?
Então novamente usei python pra salvar o dia. É um código bem simples que faz análise do HTML das grades, por dia, e cria um link do arquivo em outro diretório, TODOS, com formato "Título - Autor.ogv". Pra facilitar.
#! /usr/bin/python
# -*- coding: utf-8 -*-

"""
System to get titles and authors from FISL15 presentations,
and match them to video files, already downloaded.

To download all videos (18 GB):
    wget -nH -np -r --mirror http://hemingway.softwarelivre.org/fisl15/high/

Presentations grid:
    http://papers.softwarelivre.org/papers_ng/public/new_grid?day=9

LICENSE:
    "THE BEER-WARE LICENSE" (Revision 42):
    Helio Loureiro wrote this file. As long as you retain this notice you
    can do whatever you want with this stuff. If we meet some day, and you think
    this stuff is worth it, you can buy me a beer in return.
    Helio Loureiro"

    This email address is being protected from spambots. You need JavaScript enabled to view it.
"""
from BeautifulSoup import BeautifulSoup
import urllib2
import re
import os
import sys

URL="http://papers.softwarelivre.org/papers_ng/public/new_grid?day="
DAYS = [7, 8, 9, 10]
# My directory to find videos.  Probably you need to fix it.
TARGETDIR = "%s/Videos/FISL15" % os.environ.get('HOME')

if not os.path.exists(TARGETDIR + "/TODOS"):
    os.mkdir(TARGETDIR + "/TODOS")

for day in DAYS:
    page = urllib2.urlopen("%s%d" %(URL, day))
    soup = BeautifulSoup(page.read())

    for html  in soup.findAll('div', "slot-list"):
        for d in html.findAll('div'):
            a = d.find('div', "author")
            t = d.find('div', "title")
            l = d.find('a')

            # if empty info, move on
            if not a or not t or not l:
                continue

            # wordlist clean up
            author = re.sub("\n", "", a.string)
            author = re.sub("  ","", author)
            title = re.sub("\n", "", t.string)
            title = re.sub("  ", "", title)
            title = re.sub("/", "", title) #avoiding directory issues
            link = l.get('href')

            # since wget kept the directory structure, it is easy
            dirvideo = re.sub("http://hemingway.softwarelivre.org", TARGETDIR, link)

            # is the video over there?
            status = False
            if os.path.exists(dirvideo):
                status = True
            # False here could trigger urllib2 to download video

            print author, ",",
            print title, ",",
            print link, ",",
            print status

            if status:
                videoname = "%s/TODOS/%s - %s.ogv" % (TARGETDIR, title, author)
                if os.path.exists(videoname):
                    continue
                try:
                    os.link(dirvideo, videoname)
                except:
                    # Added this because titles w/ strings "/" where causing issues,
                    # so I had to check.  GNU/Linux was the problem (Stallman's fault).
                    print "Failed to link %s to %s" % (dirvideo, videoname)
                    sys.exit(1)
                print "Created: %s" % videoname
Em algum momento eu devo publicar o mesmo no GitHub. Sob a BWL.
Publiquei o código aqui: https://github.com/helioloureiro/FISL15_video_downloader-
Tá! Eu sei que tem um tracinho a mais ali no final do link, mas eu fiz errado e agora fica assim mesmo.
Page 22 of 39